As a precursor to investigating the precision of the AVR analogue to digital converter (on an ATtiny85 but assumed to be similar across many AVR devices) outside the recommended ranges of conversion frequency and input impedance, I set about to get to know the ADC better with a couple of “elementary” examples:
- a simple read in a while(1) loop
- a read triggered by Timer0
A Preliminary Diversion – observing the process with a logic analyser
There seemed like three main ways to see what the results were:
- transmit the results using the serial interface provided on the ATtiny and capture with a logic analyser
- as (1) but capturing the bytes on a PC (etc)
- direct display using an LCD or LEDs
#1 has the benefit of allowing inspection of the timing as well as capture of results. I have an “Open Logic Sniffer“, which is a great bit of kit for getting to know your MCU and it is a bargain (although has a few minor oddities), which I use with the Logic Sniffer Java Client. The OLS client has some nice analyser features. This was my choice, not least because I had zero experience with the ATtiny Universal Serial Interface (USI).
#2 sounds OK but the USI isn’t quite as universal as it might be – no USART – and I couldn’t be bothered to set up an arduino to relay data, although that is on my “to do” list. Also, I did want to watch the timing.
#3 looked like too much effort on an 8 pin device, given the objective.
Given my zero experience with the USI, I opted for a 3-wire setup that gives a signal that can be understood as SPI; the ATtiny plays the role of a master and just blasts out bytes assuming there is nothing to receive. The OLS client can decode the signals and serve up the transmitted bytes.
First we must setup the USI and data direction. Note that “DO” is the data out line but that Atmel have given this the synonym “MISO”, which makes sense if the ATtiny is a slave or is being programmed with an ICSP. PB0 is used as a “slave select” signal, which makes for easier interpretation of the signal traces in OLS, both by humans and the SPI analyser.
1 2 3 4 5 6 7 8 9 10 11 12 13 14 | //values to set USICR to strobe out const unsigned char usi_low = (1<<USIWM0) | (1<<USITC); const unsigned char usi_high = (1<<USIWM0) | (1<<USITC) | (1<<USICLK); //setup pins for serial // PB2 (SCK/USCK/SCL/ADC1/T0/INT0/PCINT2) // PB1 (MISO/DO/AIN1/OC0B/OC1A/PCINT1) // PB0 (MOSI/DI/SDA/AIN0/OC0A/OC1A/AREF/PCINT0) - will not be used as DI // PB0 used as /CS DDRB = (1<<DDB0) | (1<<DDB2) | (1<<DDB1);// /CS, USCK and DO as outputs PORTB |= (1<<PB0);//slave not selected //setup serial comms - 3 wire USICR = (1<<USIWM0); |
The following is called whenever one or more bytes should be sent out.
1 2 3 4 5 6 7 8 9 10 11 12 13 14 15 16 17 18 19 20 21 22 23 24 25 26 27 28 29 30 31 32 | //sends the specified byte as serial (Three wire style). void sendBytes(unsigned char bytes[], unsigned char size){ //slave select PORTB &= ~(1<<PB0); //loop over bytes for(unsigned char b = 0; b<size;b++){ //load the byte to the output register USIDR = bytes[b]; //strobe USICLK 8 cycles (also toggles clock output thanks to USITC) //an unrolled loop gives 50% duty and saves 3 clock cycles per bit sent USICR = usi_low; USICR = usi_high; USICR = usi_low; USICR = usi_high; USICR = usi_low; USICR = usi_high; USICR = usi_low; USICR = usi_high; USICR = usi_low; USICR = usi_high; USICR = usi_low; USICR = usi_high; USICR = usi_low; USICR = usi_high; USICR = usi_low; USICR = usi_high; }//bytes loop //slave de-select PORTB |= (1<<PB0); } |
Testing this with a “Hello World!” message
unsigned char send[] = "Hello World!"; sendBytes(send, sizeof(send)-1); //-1 drops the null |
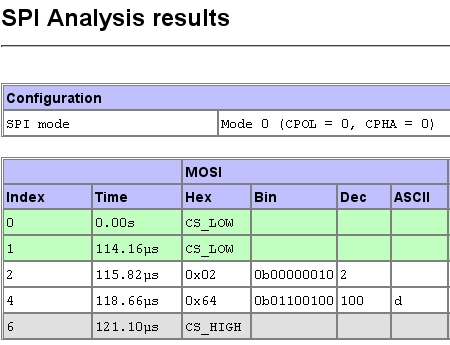
and running through the OLS Client SPI Analyser tool gives:

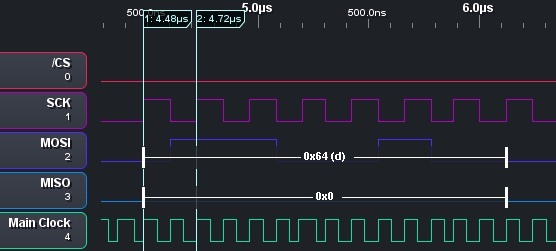
This is “mode 0” SPI style; see that the data is shifted out on a falling SCK and sampled on a rising edge. The alternating high and low assignments to USICR give a USI clock period 1/2 of the main clock since each assignment is a single cycle operation. Both can be seen in the following trace, which shows b01100100 being shifted out.

General Structure of the Code and Other Notes
Inside main() I first do some setup then I have a while(1) loop inside which is a function call. Each example/experiment exists as a separate function. Although this leads to the overhead of a few cycles to call the function, this is convenient in the present cases.
I also blew the fuse “CKOUT = [X]” so that the system clock is accessible to the logic analyser.
Simple Example
This assumes the fuse setting “SUT_CKSEL = INTRCOSC_8MHZ_6CK_14CK_0MS”, i.e. an 8MHz internal clock. Make sure that the logic analyser sampling rate is 20MHz or higher otherwise the clock signal will be mis-captured.
1 2 3 4 5 6 7 8 9 10 11 12 13 14 15 16 | //assumes 8MHz clock, hence prescaling void SimpleRead(){ //set prescaler to div64 --> 125kHz ADC clock ADCSRA |= (1<<ADPS2) | (1<<ADPS1); //start a conversion ADCSRA |= (1<<ADSC); //wait for end of conversion while (ADCSRA & (1<<ADSC)) { //do nothing } unsigned char result[2]; result[1] = ADCL;// datasheet says read low first result[0] = ADCH; sendBytes(result, 2); } |

Since this waits until the ADC conversion has finished, the interval between readings is effectively controlled by the time it takes for conversion. This is, in turn, determined by the ADC clock. The datasheet indicates the ADC clock should operate at between 50kHz and 200kHz. The datasheet also says a conversion takes 13 ADC clock cycles. Given the prescaling (code above), the conversion should take 13*64 = 832 cycles. The logic analyser (no screenshot shown) shows 901 cycles between /CS rising (happens at the end of sendBytes just before returning) and /CS falling again (happens just after entering sendBytes on the subsequent reading). Hence there are 69 main clock cyles spent doing other things: returning from sendBytes, returning from SimpleRead, process the while(1), call SimpleRead, setting ADCSRA, processing the while loop in SimpleRead, retrieving the low and high bytes, calling sendBytes. There is clearly some waste here that should be avoided in many real applications.
Timer-triggered Example
This is a rather more interesting example in which Timer0 is configured to trigger ADC conversion when the timer value = the “compare A” value. During both the timer delay and the ADC conversion, software is free to do other things since timer and ADC are hardware-controlled. At the end of the conversion an interrupt is triggered to do something with the result. In this case, just to send it out to serial.
Note that this example uses the 128kHz “watchdog” clock (fuse: “SUT_CKSEL = WDOSC_128KHZ_6CK_14CK_0MS”) to give a long enough timer 0 interval for me to detect the delay. I also used a 2s delay to change the ADC input during execution and make sure it is being properly captured. This means I had to reduce the ISP clock for in-system programming; I used 16kHz, which is reliable if slow.
The code is as follows, noting that Init_TimerTriggered() need only be called once. Note also the last line in the interrupt service routine… that one took me a while to work out!
1 2 3 4 5 6 7 8 9 10 11 12 13 14 15 16 17 18 19 20 21 22 23 24 25 26 27 28 29 30 | //setup for TimerTriggered void Init_TimerTriggered(){ //1. enable ADC completion interrupt sei();//global interrupts ADCSRA |= (1<<ADIE);//ADC interrupt //2. set the ADC to be timer triggered ADCSRB |= (1<<ADTS1) | (1<<ADTS0); //this defines the trigger source ADCSRA |= (1<<ADATE);//this is needed to enable auto-triggering //3. setup timer TCNT0 = 0x00;//counter to 0 TCCR0A = (1<<WGM01);//use "clear timer on compare match" mode OCR0A = 0x80;//output compare to 128 gives about 1s with 128kHz sys clock and prescaler (below) TCCR0B = (1<<CS02) | (1<<CS00);//prescaler to 1024, which enables the counter } //ADC completion interrupt service. //Sends the data from the ADC register ISR(ADC_vect) { //read and send ADC unsigned char result[2]; result[1] = ADCL;// datasheet says read low first result[0] = ADCH; sendBytes(result, 2); //clear timer compare flag otherwise the ADC will not be re-triggered! TIFR |= (1<<OCF0A); } |
Given the slower clock, the logic analyser sample rate and total capture package can be reduced too. I used a capture trigger (type=complex mode=serial in OLS… read the OLS tutorial!) to watch for /CS falling so 1kB of capture data at 500kHz sampling is ample to capture one timer-driven event.
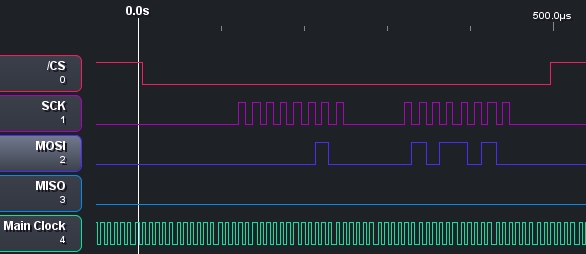
The captured trace (following ADC completion), just for completeness is:

End Stuff
Source code is also available from github.
All code is copyrighted and licenced as follows:
***Made available using the The MIT License (MIT)***
Copyright (c) 2012, Adam CooperPermission is hereby granted, free of charge, to any person obtaining a copy of this software and associated documentation files (the “Software”), to deal in the Software without restriction, including without limitation the rights to use, copy, modify, merge, publish, distribute, sublicense, and/or sell copies of the Software, and to permit persons to whom the Software is furnished to do so, subject to the following conditions:
The above copyright notice and this permission notice shall be included in all copies or substantial portions of the Software.
THE SOFTWARE IS PROVIDED “AS IS”, WITHOUT WARRANTY OF ANY KIND, EXPRESS OR IMPLIED, INCLUDING BUT NOT LIMITED TO THE WARRANTIES OF MERCHANTABILITY, FITNESS FOR A PARTICULAR PURPOSE AND NONINFRINGEMENT. IN NO EVENT SHALL THE AUTHORS OR COPYRIGHT HOLDERS BE LIABLE FOR ANY CLAIM, DAMAGES OR OTHER LIABILITY, WHETHER IN AN ACTION OF CONTRACT, TORT OR OTHERWISE, ARISING FROM, OUT OF OR IN CONNECTION WITH THE SOFTWARE OR THE USE OR OTHER DEALINGS IN THE SOFTWARE.