Building an Orrery #1: Looking for Plans

I don’t remember what made me think of it but I took a fancy to build an Orrery a little while ago. Naturally, my first recourse was to scour the web via Google for plans. I would have liked to find some dimensioned drawings in the style of engineering. What I did find was lots of other people looking for plans, designs, cad drawings etc. Noone seemed to have drawn together the following links, although a few were referenced here and there.

So, for any one else on the same quest, here is what I found…

James Ferguson: Mechanical Paradox and Sun-Earth-Moon Orrery

The so-called mechanical paradox is the basis for an orrery that differs from general practice in the way the moon is treated.

Scanned/OCR of the original account including both paradox and Orrery.

Construction notes for the paradox but not the orrery from Amateur Work Magazine Vol4.

Notes on the paradox and construction of a the orrery by Ian Coote and James Donnelly (which also appeared in the Horological Journal):

Using Meccano

This wasn’t what I was looking for but these articles contain some ideas on approaches to construction that could be useful in designing an Orrery as well as some possible gear trains.

From the Scientific Instrument Society, two articles by Michael Whiting:

Less important (IMO) is an article from Meccano Magazine.

Using Lego

Again, not what I was looking for… and Lego is not what I intend to use but possibly useful.

Best is the NASA Kepler mission has quite a few pages of information, with several models. These inspired Robert Munafo to make some modifications and to document his work.

I also found a couple of other sites that might be of interest if you do plan to use Lego:

Other Useful Sites

An anonymous blogger briefly describes making an Orrery with a minimum of tools and purchased gears. This is a bit inaccurate for my taste but the design is nice and unfussy.

The SAO/NASA Astrophysics Data System (ADS) has scanned articles from 1938 detailing gear trains (using standard gears), an initial one by Roy Marshall and a subsequent one proposing improvements by Charles Balleisen.

There is also usually a book, “Making a Tellurian/Orrery” (ISBN 1905013027) for sale on ebay.

Calculating Gear Trains

If you plan to design from scratch then the question of what gear ratios to use comes into play. If you don’t mind an inaccurate Orrery then a simple pair of gears is easy to work out but compound gears don’t have quick calculator-based solutions.

The old way of doing this, based on some 19th century maths (it still works though and is elegant to those with a mathematical bent) and going under the name of the “Stern-Brocot Tree” is mainly of historical interest. The less elegant but more practical modern approach is a fairly simply computer algorithm with a bit of brute force computer power to do lots of calculations quite fast. One such algorithm appears in Robert Norton’s Book, “The Design of Machinery”, which is freely available on Scrib as an old edition or for purchase (which includes a CD/DVD).

I have almost finished writing a program in C# for Windows using the above-mentioned algorithm which I will make available via this blog in due course (including source code).
Good Results with Cheap TCMT Tools

From the outset of setting up my metalwork shop I decided to use tungsten carbide tipped tools for the lathe. I just don’t want to be bothered with the fiddle of sharpening and having to keep changing the shims under the tools. This is at variance with the received wisdom that the low power and low spindle speeds of small lathes like my Warco 918 indicate that HSS tooling is appropriate.

The first set was from Warco and I never really got good results with the CCMT left and right hand tools, especially on aluminium but the DCMT tool with the point symmetrically arranged seemed much better. This encouraged me to try a cheap TCMT set from Chronos and must say they seem like the business. I think the small radius points and lower point angle is what allows me to get really quite good finishes on even small parts with small depths of cut in Aluminium with a max of 1800 RPM. Brass and steel are also fine.

So, my recommendation: if you are starting out get a set of 5 TCMT tools.

BTW, tip codes are generally of the form TCMT 110204, where “04” designates a 0.4mm radius on the cutting tip.

DIY Milling Machine Rev Counter for Under £5

As I have a variable speed millling machine without a digital readout (its an Axminster SIEG X2) and wanted a bit more control at the hundreds-of-RPM level than I could get by listening to the pitch of the machine or watching the chuck, some technology was required…

Cycle Computer Rev Counter on an X2 Milling Machine

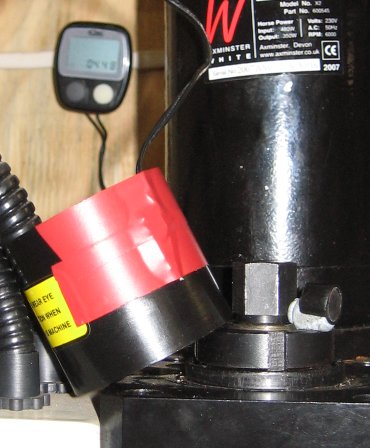
The answer was simple and cheap: use a cheap cycle computer that can read RPM (I got a new one for under a fiver off ebay). I carefully dismantled the sensor to expose the reed switch inside, which I taped to the outside of the cover for the top end of the spindle on the X2. I attached the magnet that normally fixes to the cycle wheel to the top of the spindle with a blob of blue-tack so that it ran close to the cover. Thats it! I suppose a better attachment could be achieved than blue-tack but it works fine at the relatively low spindle speeds I am interested in and I just remove the magnet afterwards.

How to Make and Use a Split Bush (Chucking Piece) for Concentric Turning

I’ve recently been making a Stuart 10V with the help of the Andrew Smith/Pengwern building guide. At one point they recommend the use of a split bush to afford a greater degree of concentricity in turning the piston rod (and both the piston and cross-head attached to this). A sketch of the split bush is provided with the throw away comment that its use requires no description. OK, that much I agree with but the making of the device led me astray.

The basic idea of the split bush is to get around the fact that the lathe chuck is likely to be a wee bit off truely concentric to its rotation axis. i.e. even perfectly cylindical rod in an unworn chuck will not rotate about its centre. The split bush is bored in situ, which does guarantee the hole is centred on the axis of rotation and the work is held in the hole. In the 10V, there is a 5/32″ piston rod and 1/8″ valve rod that need to be treated in this way. By the way, I use a Warco 918, a relatively cheap Chinese lathe and I have demonstrated that the chuck is about 0.001″ out.


(click to enlarge)

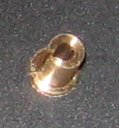
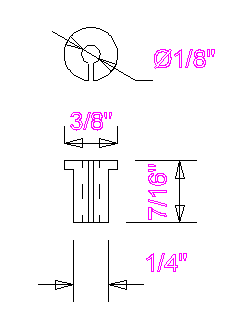
A split bush for 1/8″ diameter rod. The shoulder should sit againt the outer nose of the chuck, which is tightened to cause the bush to grip the work piece

The problem with being a self-taught novice is that you don’t know some simple stuff and don’t know which of various factors actually matter. Paranoia about defeating the whole point of the operation by removing the bush from the lathe between boring the hole and using it – would the hole now be true – led me to make the bush the wrong way. Part of the reason for this is that I had previously made a larger (1 1/4″) chucking ring where a boring bar had been used. The error I made was to drill and ream (actually I use home made D-bits) the hole after cutting the slot in the side. This doesn’t matter when using a boring bar but it does when drilling, especially as the slot size gets close to the hole size. I didn’t notice this problem with the 5/32″ piece bit it became obvious with the 1/8″ piece (see below):

I didn’t spot this until using the bush as (remember the paranoia) the bush wasn’t removed after boring and before using it. Its not like I didn’t know about drill wander but I was surprised it made so much difference and I was still paranoid. It seemed like there was no way ahead. Some Googling was done and eventually I found more than an assumption that everyone knew how to make/use these devices; I found enough to get me to have another go, the proper way. Actually I had tried to find out how to make split bushes before but not found anything so had a go… the wrong way. I decided to write this post in case anyone else needs a bit of help to do it the right way the first time.

How to Make a Split Bush Properly…

(this one did indeed seem to be right – I checked quite carefully)

  1. Face the end of some brass and turn down the 1/4″ section.
  2. Part off or remove and saw off
  3. Re-chuck, ensuring the shoulder seats on the chuck nose “nicely”
  4. Face off, centre drill, drill 3mm and ream/D-bit 1/8″ (I love mixing units)
  5. Identify one of the chuck jaws (I centre punched the chuck backplate) and mark the nascent bush to it may be precisely aligned with this jaw. A light centre-punch is nice and permanent.
  6. Remove the piece, insert a piece of rod into the centre and cut the slot in the opposite side to the marked point. The rod avoids hard-to-remove swarf buildup in the inside which will interfere with the workpiece. I’ve started using a Dremel tool for little jobs like this.
  7. Return to the lathe chuck, reseat carefully and lightly tighten the chuck, insert the work piece, tighten the chuck fully and there you are…

Paradoxical Cones – the Uphill Roller

I came across an account of the “uphill roller” in a book by Julian Havil, “Nonplussed!”. The basic idea is that two cones, joined at the bases, will appear to roll uphill on a pair of diverging rails if the combination of the angles of the cones, slope of two rails and divergence of two rails is within certain margins. Julian’s article explains the mathematical analysis and gave a simple inequality.

That looks cool, I thought, and the challenge of machining two con-joined cones appealed too.

I decided to design an adjustable set-up that would demonstrate conditions when the cones would appear to behave paradoxically and conditions when the would not. Somewhat to my surprise the finished article worked as inteded.

Downloads:

  • CAD Drawings – Draft-it format
  • CAD Drawings – GIF Images
  • Machining notes

I’ll upload a video when I have one…