Debugging Arduino using debugWire (+ Atmel Studio and an AVR Dragon)

This post is motivated by the lack of information about using debugWire with an Arduino (or similar) on the web. There are quite a few brief comments on the forums and people asking how to do it but nothing really good, with the possible exception of a post by Steve Cogswell which refers to an old version of Arduino and an old version of Atmel Studio.

This really notes for myself for next time, when I’m bound to have forgotten the recipe, but I hope someone else will find it useful. The previous post describes how to get started with using the Atmel Studio simulator, which is a good introduction to the activities required during on-chip debugging (OCD) without needing to fiddle quite so much and without wondering whether the hardware is playing nicely.

What Can You Do with debugWire?

Inspect memory, single-step through code, set break-points (at which execution will stop), inspect registers and input/output port values etc. i.e. as for the simulator, but for the real hardware.

Pre-requisites

This assumes you have:

  • an Arduino Uno
  • Atmel Studio 6 (Windows only but you could try using it from inside VirtualBox if you are a linux or Mac user – I’ve had a good experience of VirtualBox on Ubuntu, although I’ve not tried Atmel Studio )
  • an AVR Dragon (a fairly cheap USB programmer/on-chip-debugger) and a 6-way cable to connect it.

I also recommend you get the ATMega328 data sheet.

Preparing the Hardware

The ATMega328 data sheet says:

• Capacitors connected to the RESET pin must be disconnected when using debugWire.
• All external reset sources must be disconnected.

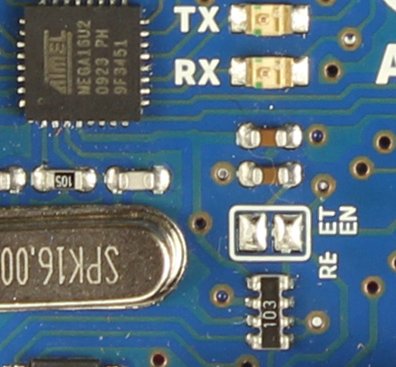
If you check the Arduino Schematic, you will see that there IS a 100nF capacitor connected to RESET. This is used to cause a reset to be triggered when communication is initiated via the USB. This is normally useful since a reset is needed to prompt the bootloader on the Arduino to receive compiled code in the upload process.

In the older Arduinos you had to remove the capacitor (as per Steve Cogswell’s post) but on the Uno there is a bit of circuit board track specially prepared for cutting and re-soldering later if need be. If you leave it cut then it will be necessary to manually press the reset button just as the Arduino IDE (or avrdude) tries to start an upload.

RESET EN marks the place you need to cut (between the two solder pads)

Preparing the Software

This is basically just a case of compiling the code for the Arduino in Atmel Studio as I’ve previously described. It is NOT necessary to upload the compiled code using avrdude because Atmel Studio will do this for us via debugWire.

Preparing the Hardware

Connect the Dragon ISP header to the Arduino ISP header. Note that pin1 connects to pin1 on the other device, i.e. MISO connects to MISO. Both Dragon and Ardiuno are separately powered through their USB connectors and the Dragon senses the Arduino’s power supply voltage through the 6-way connector.

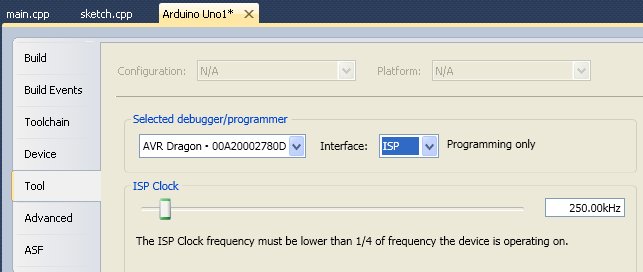
Select the Dragon as the tool to use

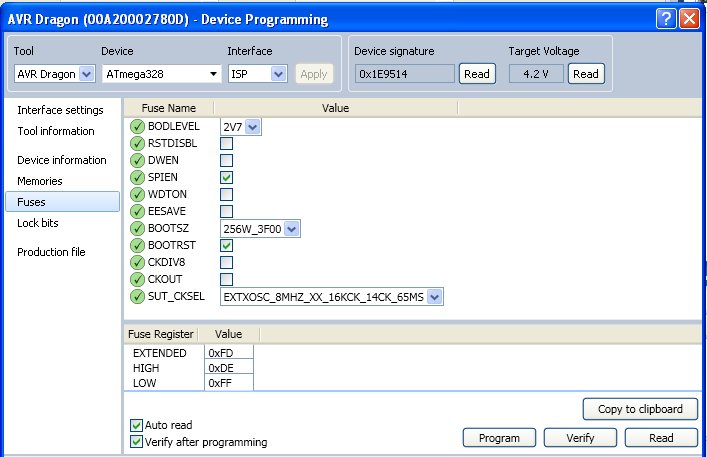
Open the device programmer using Tools|Device Programming menu or: program button.

Make sure Tool, Device and Interface are correct then click "Apply" to connect.
Make sure Tool, Device and Interface are correct then click “Apply”.

You can also “Read” the device signature to confirm that the physical device matches the one chosen in Atmel Studio. This will happen automatically later on anyway and Atmel Studio will block you if it isn’t right.

Warning… and Being Prepared

As described in Steve Cogswell’s post, it is possible to make a non-permanent mess of the ATMega328. It may be necessary to use the “HV” programming on the AVR Dragon if the ATMega gets stuck in debugWire mode and it may be necessary to re-install the boot-loader. These are not difficult if you have an AVR Dragon (or presumably other programmers too).

It can be useful if you need to recover from mishap, and is generally a good plan, I think, to get the fuse settings BEFORE messing about with debugWire and before fiddling with them. All you need to convert a factory fresh ATMega328 into something usable on an Arduino board is to set the fuses correctly and to program the boot loader.

Use "Copy to clipboard" and save the fuse settings somewhere save. Do the same for the Lock bits.
Use “Copy to clipboard” and save the fuse settings somewhere save. Do the same for the Lock bits.

The debugWire Cycle

This is the sequence of operations I have found works reliably. Try this with “Blink” (if you’ve carried on from the simulation example, remember to replace the delay() lines). NB: step 7 is important to get your chip back into its normal state.

  1. Program the DWEN fuse: make sure the box is ticked then click “Program”.
  2. Cycle the power on the Arduino by temporarily disconnecting the USB connector. At this point, you can probably no longer use the ISP interface.
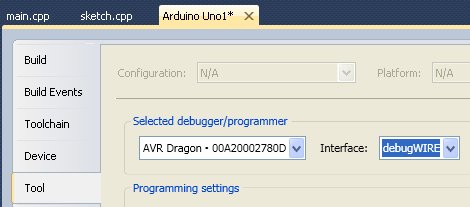
  3. Set debugWire as the interface (see screenshot below)
  4. Click “Start Debugging and Break” or hit Alt+F5 or set a break-point then “Start Debugging” (F5). Note: this uploads the program too.
  5. Set break-points, single-step etc. Use the “IO View” to manually change the value of output pins on the Arduino, yes, the real ones!
  6. Stop debugging (Ctrl+Shift+F5), change the code and return to step 4.
  7. Menu “Debug|Disable debugWIRE and close”. This menu item is only accessible when debugging so you may need to use F5 again. The DWEN flag will now be reset and you will be able to use the ISP interface again.
Set the interface to debugWIRE
Set the interface to debugWIRE (step 3)

Now compare the fuses and lock-bits to the previously saved settings. They should be identical. debugWIRE should also have preserved the bootloader so it should be possible to go back to the Arduino IDE; you only need to remember to press the Arduino reset button just as the IDE announces it is uploading in order that the bootloader executes.

Simulating Arduino Code using Atmel Studio 6

The next post will look at on-chip-debugging (OCD) but it is worth using the Atmel Studio Simulator first. Using the simulator isn’t practical unless the input-output is pretty simple because it doesn’t simulate attached devices or real-time events. But even so, you can fiddle with input/output at the bit level and follow the way variables in the code change as it executes. This is MUCH smarter than using Serial.println() because once you’ve mastered Atmel Studio, you can save plenty of time. And poking about with the simulator helps to make sense of what is going on inside code such as “int led=13” or “digitalWrite(12, HIGH)”. All clean fun, and you don’t need any hardware other than a PC.

This starts off as just a case of compiling the code in Atmel Studio so you can set break-points or step line-by-line through the code to see what happens. See an earlier post of mine for how to get an Arduno sketch to become an Atmel Studio 6 project or just download the Atmel Studio project to match the following.

device
First make sure you have selected the right target device
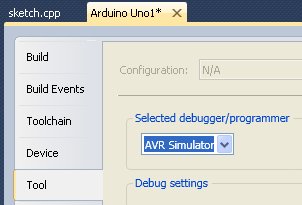
choose_simulator
Then choose the simulator as the device

I have the “device and debugger toolbar” permanently enabled: device and debugger toolbar.

Tracing Input/Output

I’m going to use “blink” with delay() commented out because I have also found that use of delay() causes problems. Real time stuff doesn’t make sense in a step-through simulator anyway.

Set a breakpoint by clicking in the margin
Set a break-point by clicking in the margin

Now just hit F5 (or the green “play” icon) , watch the compile and wait for the break-point line to become highlighted in yellow. Now make sure the “IO View” is open. Use F10 to step through lines or the “Step Over” icon. If you F11/”Step Into”, you will end up inside the code that implements digitalWrite().

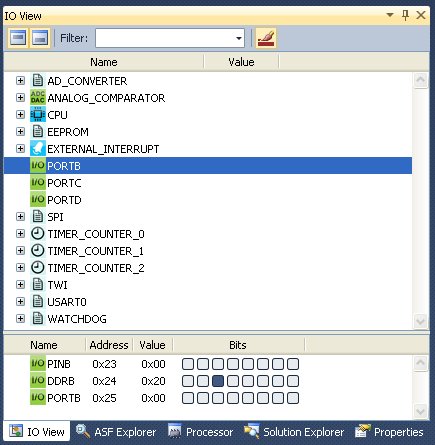
IO View showing PORTB inputs/outputs, which includes Arduino pin 13 as "bit 5"
IO View showing PORTB inputs/outputs, which includes Arduino pin 13 as “bit 5”. DDRB is set because pin13 is defined as an output. The bottom row is the output. PINB is the input value, which just follows the output.

Step through and watch bit 5 change, with nice highlighting in red. You can also click on it to change the value manually. I tend to use keyboard shortcuts but you might prefer the toolbar: step toolbar (watch, step-into, step-over and step-out). Step-Out is handy if you accidentally Step-Into the code for digitalWrite(), for example.

It should be an easy step to modify blink to read pin11 and write the value to pin12. Which bits of PORTB are these? Click on the appropriate bit in the PINB row to set the input value as high or low and step through to see it propagate to the output. Does it work if pin11 is set as an output (DDRB is set for that bit)?

Watching CPU Clock Cycles

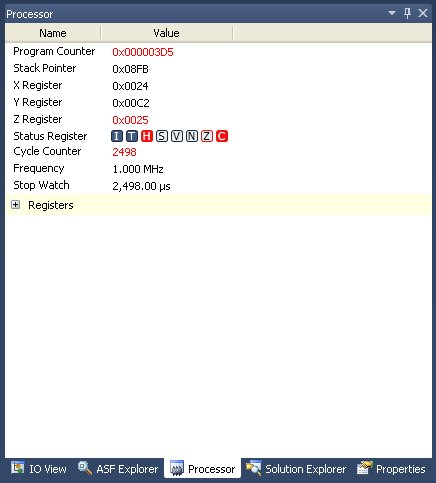
Open the Processor view and watch the “Cycle Counter” as you step through. Changes in this indicate how many CPU clock cycles were needed to execute the line(s) of code. You can over-type the value to zero. At 16MHz clock, each cycle is 1/16,000,000s long so it how long does it take for the two digitalWrite()s in blink to execute?

Processor View is a little cryptic except for Cycle Counter

 Watching Variables

Declare a boolean called “in” and read pin 11 into “in” before doing a digitalWrite(12, in). Now select the text “in” and add a “QuickWatch” (Shift F9 or click the glasses icon). Step through as before, manually changing bit 3 (pin 11) in “IO View”. NB: you can manually change values in the “Watch 1” tab too.

The result of a QuickWatch of both "led" and "in", which has just changed to 1
The result of a QuickWatch of both “led” and “in”, which has just changed to 1

OK… that was too simple but… Now find the “Memory 1” view (try Debug|Windows menu) and select “Memory: data IRAM”. Step through again and see if you can see which memory byte stores the value of “in”. Hint: in my case it was address 0x01df. Now add a QuickWatch for “led”, find the memory location and check its value is 0x0d (i.e. hexadecimal for 13 in decimal). See what happens in the Memory view if you change the value of “led” in Watch 1 to be -1 or 512. It should be clear that “led” uses two bytes of storage (check the Arduino reference and it says “Integers …  store a 2 byte value. This yields a range of -32,768 to 32,767”).


Rial’s Dungeon – an Open Source Tile-turning Game

This game is played on a table with bits of paper, counters and dice. The rules are quite simple and it is intended for playing with children. There are monsters, treasure, potions, traps, locked doors, chests… the usual stuff.

The Rials Dungeon v1 zip file download contains:

  • rules (MS Word docx)
  • the playing board (9 printed pages to stick onto a board backing) (MS Word docx)
  • sets of tiles to print out and guillotine (MS Word docx), which are laid out on the playing board and revealed as play proceeds
  • sets of cards (MS Word pptx) to print out and guillotine, which relate to contents of chests, chance events, useful items and treasure

There is no nice artwork and the rules get revised each time we play.

All content in the ZIP is licensed using CC BY-SA 2.0 UK because I want anyone who improves it to share their improvements back. Please link back to this post so I can find improvements and variations.

AVR Timer1 Dead Time Generator Example (ATtiny85)

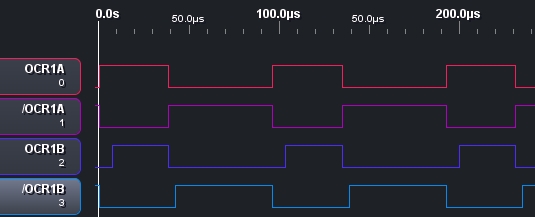
The ATtiny 25/45/85 datasheet has an intriguing section about the “dead time generator” that I found a little confusing. A little practical example helped me to understand it. The code and logic analyser trace (made using the same analyser and client mentioned in previous posts) appear below. This is just an example to understand how it works. Real applications seem to be principally brushless DC motor control (pdf).

The setup below uses both A and B compare registers with the same compare value and applies some dead time to the B output so that the effect can be easily seen. I was also tempted to play around with the C compare register which sets the value at which the counter resets. Read the code comments for more…

Timer1 with Dead Time
1
2
3
4
5
6
7
8
9
10
11
12
13
14
15
16
17
18
19
20
21
22
23
24
25
26
27
28
29
30
31
32
33
34
35
36
37
38
39
40
41
//set the top count give whole number percentage duty cycles
const unsigned char top = 99;
//40% duty cycle if top=99
const unsigned char compare = 39;
//prescale CLK/8, 8Mz clock and div8 prescale -> 1MHz tick -> appropx 10kHz output with top=99
const unsigned char prescaleTimer = (1<<CS12);
//prescale CLK/4.
const unsigned char prescaleDead = (1<<DTPS11);// div 8 = (1<<DTPS11) | (1<<DTPS10)
// with CLK/4 prescale and 8MHz clock the dead time is 0.5uS per LSB.
// Dead time is delay to rising edge of signal
const unsigned char deadHigh = 0x0F; //8uS dead time for OCR1B. Max 0x0F
const unsigned char deadLow = 0x08; //4uS dead time for /OCR1B
 
int main(void)
{
	//set data direction for output compare A and B, incl complements
	DDRB = (1<<PB4) | (1<<PB3) | (1<<PB1) | (1<<PB0);
 
	//setup timer1 with PWM. Will be using both A and B compare outputs.
	// both compares will be the same but only B will have dead time applied
	OCR1A = compare;
	OCR1B = compare;
	TCCR1 = (1<<PWM1A) | (1<<COM1A0); //Compare A PWM mode with complement outputs
	GTCCR = (1<<PWM1B) | (1<<COM1B0); //Compare B PWM mode with complement outputs
 
	//PLLCSR is not set so the PLL will not be used (are using system clock directly - "synchonous mode")
	//OCR1C determines the "top" counter value if CTC1 in TCCR1 is set. Otherwise "top" is normal: 0xFF
	OCR1C = top;
	TCCR1 |= (1<<CTC1);
	TCCR1 |= prescaleTimer; 
 
	//setup dead time for compare B. Note the prescaler is independent of timer1 prescaler (both receive the same clk feed)
	DTPS1 = prescaleDead;
	//DT1A is unset - output A has no dead time
	DT1B = (deadHigh<<4) | deadLow;
 
    while(1)
    {
        //do nothing
    }
}
40% duty cycle with no dead time on OC1A and different amounts of dead time added to OC1B and its complement.
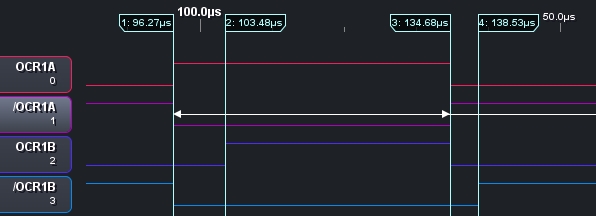
Checking the dead time matches what is expected. The fractional differences can be ascribed to a combination of the on-chip clock oscilator not being exactly 8MHz with a minor addition effect from the logic analyser sampling rate (100Mhz)

End Stuff

Source code is also available from github.

All code is copyrighted and licenced as follows:

***Made available using the The MIT License (MIT)***
Copyright (c) 2012, Adam Cooper

Permission is hereby granted, free of charge, to any person obtaining a copy of this software and associated documentation files (the “Software”), to deal in the Software without restriction, including without limitation the rights to use, copy, modify, merge, publish, distribute, sublicense, and/or sell copies of the Software, and to permit persons to whom the Software is furnished to do so, subject to the following conditions:

The above copyright notice and this permission notice shall be included in all copies or substantial portions of the Software.

THE SOFTWARE IS PROVIDED “AS IS”, WITHOUT WARRANTY OF ANY KIND, EXPRESS OR IMPLIED, INCLUDING BUT NOT LIMITED TO THE WARRANTIES OF MERCHANTABILITY, FITNESS FOR A PARTICULAR PURPOSE AND NONINFRINGEMENT. IN NO EVENT SHALL THE AUTHORS OR COPYRIGHT HOLDERS BE LIABLE FOR ANY CLAIM, DAMAGES OR OTHER LIABILITY, WHETHER IN AN ACTION OF CONTRACT, TORT OR OTHERWISE, ARISING FROM, OUT OF OR IN CONNECTION WITH THE SOFTWARE OR THE USE OR OTHER DEALINGS IN THE SOFTWARE.

AVR ADC #2 – Experiments in Operating the ADC at High/Low Sample Rates (ATtiny85)

This article builds on the previous one.

This experiment was stimulated by wanting to have a 128kHz system clock but still be able to use the ADC. Section 17.5 of the datasheet clearly says:

… requires an input clock frequency of between 50kHz and 200kHz to get maximum resolution. If a lower resolution than 10 bits is needed, the input clock frequency to the ADC can be higher than 200 kHz to get a higher sample rate. It is not recommended to use a higher input clock frequency than 1 MHz.

Section 17.8 goes on to say:

The ADC is optimized for analog signals with an output impedance of approximately 10 kΩ or less. If such a source is used, the sampling time will be negligible. If a source with higher impedance is used, the sampling time will depend on how long time the source needs to charge the S/H capacitor, with can vary widely. The user is recommended to only use low impedant sources with slowly varying signals, since this minimizes the required charge transfer to the S/H capacitor.

There is some information on the web, particularly about the limitations of ATtiny/mega for high symbol rate signal processing but I wanted to try for myself and gather some data. The questions are: how does precision vary as both frequency and impedance vary, especially outside the specified range. Given the information in the datasheet, both the comments above and the general description of the sample and hold circuitry, the worst performance should occur for high impedance and high frequency. It turns out this is observed but the story is a little more interesting.

The Circuit and the Code

This uses the same approach as the previous post.

The circuit is minimal and constructed on breadboard. ICSP from an AVR Dragon was fed into a header and left connected. A 100n cap was bridged from pins 4 to 8 over the IC. Three different potentiometers were used: 250k, 47k, 5k. 5V was supplied from the Dragon.

The same code is used with both a 8MHz and a 128kHz main clock – the fuses are set to use the internal oscillators – and the ADC clock frequency changed using the ADC prescaler; after taking an ADC reading, the prescaler is moved to the next higher division factor. See the code below.

Varying the ADC Clock
1
2
3
4
5
6
7
8
9
10
11
12
13
14
15
16
17
18
19
void Degrade_2(){
	unsigned char result[2];
	for(unsigned char prescale=1; prescale<=7; prescale++){
		//clear then re-assert the prescaler
		ADCSRA &= 0xF8;
		ADCSRA |= prescale;
		//start a conversion
		ADCSRA |= (1<<ADSC);
		//wait for end of conversion
		while (ADCSRA & (1<<ADSC));
		result[1] = ADCL;// datasheet says read low first
		result[0] = ADCH;
		sendBytes(result, 2);
	}
 
	//send a comma to separate readings
	unsigned char comma[]=",";
	sendBytes(comma,1);
}

Results 1: Low ADC Clock Frequency

This was a surprise. With a 128kHz main clock, the ADC gets clocked at from 64kHz down to 1kHz. No degradation of precision was observed, no matter which potentiometer was used and no matter what input voltage was selected.

Everything looked normal on the waveform, with the decreasing ADC clock rate clearly showing up as increasing conversion times.

Zoomed-out view of the ADC Clock Changing Experiment.

So it looks like I can just use a slow clock and not worry about the ADC.

Results 2: High ADC Clock Frequency

For a 8MHz system clock the ADC clock will be 4MHz, 2MHz, 1MHz, 500kHz, 250kHz, 125kHz, 62.5kHz according to the prescale value.

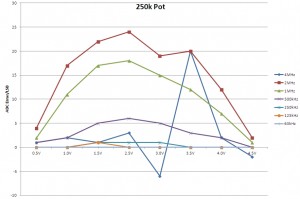
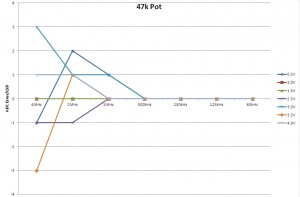
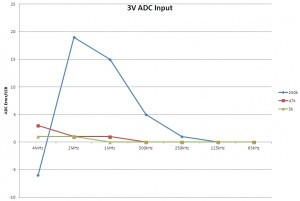
A representative range of input voltages were used for each potentiometer using a multimeter which was disconnected before taking ADC readings. The ADC error is calculated assuming the 62.5kHz reading is correct. Three or more readings were taken for each ADC clock rate to confirm stability; no more than 1LSB variation was observed and the median was used. In all cases 10 bit conversion results are considered.

(click for full size)

Although 4MHz looked OK sometimes, it is clearly very messed up! The effect of higher input impedance is clear but even so, we are getting 8 bit precision for most of the input voltage range at 500kHz. Remember the preferred input impedance is around 10k. Just outside the datasheet max freq, at 250kHz the error is down to the least significant bit. So it looks like this device at least is capable of adequate performance a little bit outside both impedance and frequency ranges.

(click for full size)
NB: the plot is slightly distorted since there is no 2V reading.

The second plot shows more clearly the change of error as the potentiometer is swept across its range. The 3V readings seem to be particulary badly affected by the very high frequencies.

(click for full size)

With a 47k potentiometer, which I consider to be compliant with the datasheet impedance requirement, the results look rather impressive. Even at 4MHz there is only a 3LSB error, i.e. we are getting 8 bits of precision (the top 8 bits of the 10 bit results) give or take some quantization error. Although… I am still rather suspicious of 4MHz and I did not explore a wider range of input voltages. At 2MHz, though, this device looks reliably better than 8 bits across most of the input voltage range.

(click for full size)

The final plot shows the case for 3V, which looks like the worst-case, and neatly summarises how far you can push this ATtiny85. The 5k potentiometer is not really significantly better than the 47k except for 4MHz.

End Stuff

Source code is also available from github. A spreadsheet of results and the plots is also there.

All code is copyrighted and licenced as follows:

***Made available using the The MIT License (MIT)***
Copyright (c) 2012, Adam Cooper

Permission is hereby granted, free of charge, to any person obtaining a copy of this software and associated documentation files (the “Software”), to deal in the Software without restriction, including without limitation the rights to use, copy, modify, merge, publish, distribute, sublicense, and/or sell copies of the Software, and to permit persons to whom the Software is furnished to do so, subject to the following conditions:

The above copyright notice and this permission notice shall be included in all copies or substantial portions of the Software.

THE SOFTWARE IS PROVIDED “AS IS”, WITHOUT WARRANTY OF ANY KIND, EXPRESS OR IMPLIED, INCLUDING BUT NOT LIMITED TO THE WARRANTIES OF MERCHANTABILITY, FITNESS FOR A PARTICULAR PURPOSE AND NONINFRINGEMENT. IN NO EVENT SHALL THE AUTHORS OR COPYRIGHT HOLDERS BE LIABLE FOR ANY CLAIM, DAMAGES OR OTHER LIABILITY, WHETHER IN AN ACTION OF CONTRACT, TORT OR OTHERWISE, ARISING FROM, OUT OF OR IN CONNECTION WITH THE SOFTWARE OR THE USE OR OTHER DEALINGS IN THE SOFTWARE.

AVR ADC #1 – Basic Examples (ATtiny85)

As a precursor to investigating the precision of the AVR analogue to digital converter (on an ATtiny85 but assumed to be similar across many AVR devices) outside the recommended ranges of conversion frequency and input impedance, I set about to get to know the ADC better with a couple of “elementary” examples:

  • a simple read in a while(1) loop
  • a read triggered by Timer0

A Preliminary Diversion – observing the process with a logic analyser

There seemed like three main ways to see what the results were:

  1. transmit the results using the serial interface provided on the ATtiny and capture with a logic analyser
  2. as (1) but capturing the bytes on a PC (etc)
  3. direct display using an LCD or LEDs

#1 has the benefit of allowing inspection of the timing as well as capture of results. I have an “Open Logic Sniffer“, which is a great bit of kit for getting to know your MCU and it is a bargain (although has a few minor oddities), which I use with the Logic Sniffer Java Client. The OLS client has some nice analyser features. This was my choice, not least because I had zero experience with the ATtiny Universal Serial Interface (USI).

#2 sounds OK but the USI isn’t quite as universal as it might be – no USART – and I couldn’t be bothered to set up an arduino to relay data, although that is on my “to do” list. Also, I did want to watch the timing.

#3 looked like too much effort on an 8 pin device, given the objective.

Given my zero experience with the USI, I opted for a 3-wire setup that gives a signal that can be understood as SPI; the ATtiny plays the role of a master and just blasts out bytes assuming there is nothing to receive. The OLS client can decode the signals and serve up the transmitted bytes.

 
First we must setup the USI and data direction. Note that “DO” is the data out line but that Atmel have given this the synonym “MISO”, which makes sense if the ATtiny is a slave or is being programmed with an ICSP. PB0 is used as a “slave select” signal, which makes for easier interpretation of the signal traces in OLS, both by humans and the SPI analyser.

Code to setup ATtiny85 for 3-wire mode
1
2
3
4
5
6
7
8
9
10
11
12
13
14
//values to set USICR to strobe out
const unsigned char usi_low = (1<<USIWM0) | (1<<USITC);
const unsigned char usi_high = (1<<USIWM0) | (1<<USITC) | (1<<USICLK);
 
//setup pins for serial
//  PB2 (SCK/USCK/SCL/ADC1/T0/INT0/PCINT2)
// 	PB1 (MISO/DO/AIN1/OC0B/OC1A/PCINT1)
// 	PB0 (MOSI/DI/SDA/AIN0/OC0A/OC1A/AREF/PCINT0) - will not be used as DI
//	PB0 used as /CS
DDRB = (1<<DDB0) | (1<<DDB2) | (1<<DDB1);// /CS, USCK and DO as outputs
PORTB |= (1<<PB0);//slave not selected
 
//setup serial comms - 3 wire
USICR = (1<<USIWM0);

The following is called whenever one or more bytes should be sent out.

Code to send bytes in 3-wire mode
1
2
3
4
5
6
7
8
9
10
11
12
13
14
15
16
17
18
19
20
21
22
23
24
25
26
27
28
29
30
31
32
//sends the specified byte as serial (Three wire style).
void sendBytes(unsigned char bytes[], unsigned char size){
	//slave select
	PORTB &= ~(1<<PB0);
 
	//loop over bytes
	for(unsigned char b = 0; b<size;b++){
		//load the byte to the output register
		USIDR = bytes[b];
		//strobe USICLK 8 cycles (also toggles clock output thanks to USITC)
		//an unrolled loop gives 50% duty and saves 3 clock cycles per bit sent
		USICR = usi_low;
		USICR = usi_high;
		USICR = usi_low;
		USICR = usi_high;
		USICR = usi_low;
		USICR = usi_high;
		USICR = usi_low;
		USICR = usi_high;
		USICR = usi_low;
		USICR = usi_high;
		USICR = usi_low;
		USICR = usi_high;
		USICR = usi_low;
		USICR = usi_high;
		USICR = usi_low;
		USICR = usi_high;		
	}//bytes loop	
 
	//slave de-select
	PORTB |= (1<<PB0);		
}

Testing this with a “Hello World!” message

Say Hello World! in 3-wire mode
		unsigned char send[] = "Hello World!";
		sendBytes(send, sizeof(send)-1);	//-1 drops the null

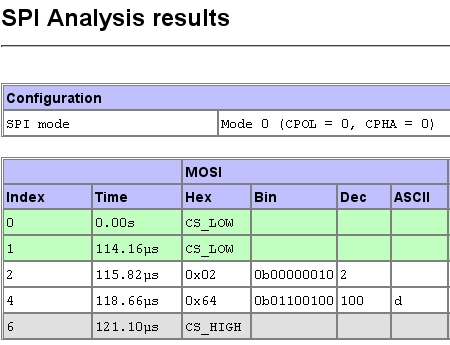
and running through the OLS Client SPI Analyser tool gives:

(click for full size)

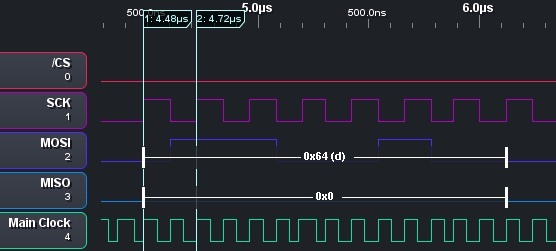
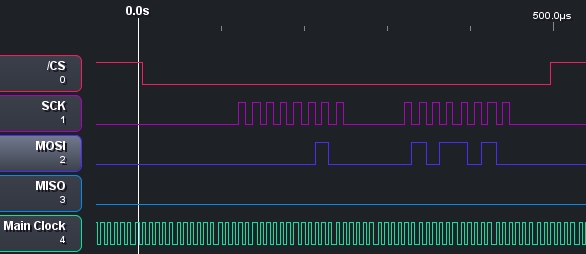
This is “mode 0” SPI style; see that the data is shifted out on a falling SCK and sampled on a rising edge. The alternating high and low assignments to USICR give a USI clock period 1/2 of the main clock since each assignment is a single cycle operation. Both can be seen in the following trace, which shows b01100100 being shifted out.

SCK (serial clock) vs Main Clock Timing and Illustration of Mode 0.

General Structure of the Code and Other Notes

Inside main() I first do some setup then I have a while(1) loop inside which is a function call. Each example/experiment exists as a separate function. Although this leads to the overhead of a few cycles to call the function, this is convenient in the present cases.

I also blew the fuse “CKOUT = [X]” so that the system clock is accessible to the logic analyser.

Simple Example

This assumes the fuse setting “SUT_CKSEL = INTRCOSC_8MHZ_6CK_14CK_0MS”, i.e. an 8MHz internal clock. Make sure that the logic analyser sampling rate is 20MHz or higher otherwise the clock signal will be mis-captured.

perform a single read and send H and L bytes to serial
1
2
3
4
5
6
7
8
9
10
11
12
13
14
15
16
//assumes 8MHz clock, hence prescaling 
void SimpleRead(){
	//set prescaler to div64 --> 125kHz ADC clock
	ADCSRA |= (1<<ADPS2) | (1<<ADPS1);
	//start a conversion
	ADCSRA |= (1<<ADSC);
	//wait for end of conversion
	while (ADCSRA & (1<<ADSC))
	{
		//do nothing
	}
	unsigned char result[2];
	result[1] = ADCL;// datasheet says read low first
	result[0] = ADCH;
	sendBytes(result, 2);
}
SPI Analysis Results from OLS Client

Since this waits until the ADC conversion has finished, the interval between readings is effectively controlled by the time it takes for conversion. This is, in turn, determined by the ADC clock. The datasheet indicates the ADC clock should operate at between 50kHz and 200kHz. The datasheet also says a conversion takes 13 ADC clock cycles. Given the prescaling (code above), the conversion should take 13*64 = 832 cycles. The logic analyser (no screenshot shown) shows 901 cycles between /CS rising (happens at the end of sendBytes just before returning) and /CS falling again (happens just after entering sendBytes on the subsequent reading). Hence there are 69 main clock cyles spent doing other things: returning from sendBytes, returning from SimpleRead, process the while(1), call SimpleRead, setting ADCSRA, processing the while loop in SimpleRead, retrieving the low and high bytes, calling sendBytes. There is clearly some waste here that should be avoided in many real applications.

Timer-triggered Example

This is a rather more interesting example in which Timer0 is configured to trigger ADC conversion when the timer value = the “compare A” value. During both the timer delay and the ADC conversion, software is free to do other things since timer and ADC are hardware-controlled. At the end of the conversion an interrupt is triggered to do something with the result. In this case, just to send it out to serial.

Note that this example uses the 128kHz “watchdog” clock (fuse: “SUT_CKSEL = WDOSC_128KHZ_6CK_14CK_0MS”) to give a long enough timer 0 interval for me to detect the delay. I also used a 2s delay to change the ADC input during execution and make sure it is being properly captured. This means I had to reduce the ISP clock for in-system programming; I used 16kHz, which is reliable if slow.

The code is as follows, noting that Init_TimerTriggered() need only be called once. Note also the last line in the interrupt service routine… that one took me a while to work out!

Timer Triggered ADC
1
2
3
4
5
6
7
8
9
10
11
12
13
14
15
16
17
18
19
20
21
22
23
24
25
26
27
28
29
30
//setup for TimerTriggered
void Init_TimerTriggered(){
	//1. enable ADC completion interrupt
	sei();//global interrupts
	ADCSRA |= (1<<ADIE);//ADC interrupt
 
	//2. set the ADC to be timer triggered
	ADCSRB |= (1<<ADTS1) | (1<<ADTS0); //this defines the trigger source
	ADCSRA |= (1<<ADATE);//this is needed to enable auto-triggering
 
	//3. setup timer
	TCNT0 = 0x00;//counter to 0
	TCCR0A =  (1<<WGM01);//use "clear timer on compare match" mode
	OCR0A = 0x80;//output compare to 128 gives about 1s with 128kHz sys clock and prescaler (below)
	TCCR0B = (1<<CS02) | (1<<CS00);//prescaler to 1024, which enables the counter
}
 
//ADC completion interrupt service.
//Sends the data from the ADC register
ISR(ADC_vect)
{
	//read and send ADC
	unsigned char result[2];
	result[1] = ADCL;// datasheet says read low first
	result[0] = ADCH;
	sendBytes(result, 2);
 
	//clear timer compare flag otherwise the ADC will not be re-triggered!
	TIFR |= (1<<OCF0A);
}

Given the slower clock, the logic analyser sample rate and total capture package can be reduced too. I used a capture trigger (type=complex mode=serial in OLS… read the OLS tutorial!) to watch for /CS falling so 1kB of capture data at 500kHz sampling is ample to capture one timer-driven event.

The captured trace (following ADC completion), just for completeness is:

End Stuff

Source code is also available from github.

All code is copyrighted and licenced as follows:

***Made available using the The MIT License (MIT)***
Copyright (c) 2012, Adam Cooper

Permission is hereby granted, free of charge, to any person obtaining a copy of this software and associated documentation files (the “Software”), to deal in the Software without restriction, including without limitation the rights to use, copy, modify, merge, publish, distribute, sublicense, and/or sell copies of the Software, and to permit persons to whom the Software is furnished to do so, subject to the following conditions:

The above copyright notice and this permission notice shall be included in all copies or substantial portions of the Software.

THE SOFTWARE IS PROVIDED “AS IS”, WITHOUT WARRANTY OF ANY KIND, EXPRESS OR IMPLIED, INCLUDING BUT NOT LIMITED TO THE WARRANTIES OF MERCHANTABILITY, FITNESS FOR A PARTICULAR PURPOSE AND NONINFRINGEMENT. IN NO EVENT SHALL THE AUTHORS OR COPYRIGHT HOLDERS BE LIABLE FOR ANY CLAIM, DAMAGES OR OTHER LIABILITY, WHETHER IN AN ACTION OF CONTRACT, TORT OR OTHERWISE, ARISING FROM, OUT OF OR IN CONNECTION WITH THE SOFTWARE OR THE USE OR OTHER DEALINGS IN THE SOFTWARE.

Using Atmel Studio 6 IDE with Arduino (Uno and Leonardo)

The benefits of the Atmel Studio 6 IDE (if you can get to grips with it) are described in various places so I won’t repeat them here. For my part, I began using it with an AVR Dragon board for programming micrcontrollers directly (i.e. not using the arduino or similar development boards). I have also started writing some libraries and found the Arduino IDE to be a bit limited. I wanted to be able to use Atmel Studio to create programs that would also be usable, ideally with no change, on Arduino boards with the Arduino IDE being used. A further complication is that I have both Uno and Leonardo boards, which have a different processor and so need separate code compilation.

There are several guides to achieving this kind of thing (Google “atmel studio arduino”) but most seemed to be rather involved and not well suited to having boards with different processors. The best I found, which is not at all “involved”, was by Elco Jacobs. He approached the task with the kind of strategy I wanted and his account and example code saved me a lot of trial and error. There were a few points where I wanted to do things a little differently; this post is about the changes and some experiences along the way. It is partly written so I remember how it works…

There are two main parts to getting things to work: compiling the code and uploading to the arduino. Although I do have an AVR Dragon and could have used in-system programming (ICSP), I wanted to be be able to use the normal process of using the serial upload over USB and to leave the bootloader intact.

The end point of the following, which is not as complicated as it looks, is that a new Arduino IDE compatible “sketch” can be begun by clicking the New Project icon in the tool bar and selecting one of two templates according to the target board.

1 – compiling the code

This is the easier part of the two.  The approach taken can be broken down into two: configuring Atmel Studio and creating a C++ harness within which a verbatim Arduino sketch can be executed. Since there are differences between Uno and Leonardo, I created two versions of the following steps: one for each board.

1a) configuring Atmel Studio

Start off creating a new Executable C++ project and choose the correct microcontroller type (ATmega328P for Uno and ATmega32U4 for Leonardo).

Open the project properties and select the “toolchain” set of properties. Under “AVR/GNU C++ Compiler” you should see several groups of properties.

Directories

Add two entries to locate the source files for the Arduino core and be sure to un-check the “relative path” option. These are to be found wherever you installed the Arduino IDE. For me, and for the Uno, they are:

  • C:\Program Files\Arduino\hardware\arduino\cores\arduino
  • C:\Program Files\Arduino\hardware\arduino\variants\standard

The second of these would have “leonardo” instead of “standard” for the Leonardo board.

If you use any of the Arduno libraries, you must add additional entries to “Directories” for each one: e.g. “C:\Program Files\Arduino\libraries\EEPROM”

Optimisation

Set the compiler to optimise for size and check the -ffunction-sections option.

In addition, under “AVR/GNU Linker”, set the optimisation to garbage collect unused sections.

Symbols

Add two entries (these are applicable for Uno and Leonardo; the first denotes “Arduno 1.0 libraries” and the second denotes a 16MHz clock):

  • ARDUINO=100
  • F_CPU=16000000L

1b) the sketch harness

Two C++ files are used. One will contain the sketch and one contains a few lines of code to hook in the Arduino core libraries and the main program from which the usual “setup()” and “loop()” components of a sketch are called. I named these “sketch.cpp” and “main.cpp” respectively.

This arrangement means that if you want to compile the same sketch with different Arduino boards as the target you can use exactly the same sketch.cpp in two different Atmel Studio projects. The neatest approach would be to point both projects at the same file, rather than copying it, of course!

 sketch.cpp

If you already have an arduino sketch (.ino or .pde) then the content of it may just be copied and renamed sketch.cpp.

There are, however, two small extras that may be required at the top of the sketch:

  1. if there are any functions other than void setup() and void loop() then it is necessary to add a function prototype. This means that if there is a function “void serialMessage()” then you must add “void serialMessage();” at the head of sketch.cpp in addition to the function itself. Google “arduino function prototype” to find out more.
  2. if a library such as EEPROM is used then it may be necessary to change the #include to point to the .cpp file rather than the .h file. If EEPROM.h does NOT contain a #include <EEPROM.cpp> then you need to point to EEPROM.cpp from the sketch otherwise the compiler will not find the definition of EEPROM. Wire and SD libraries are even more tedious in that there are 1 or more additional files to include… check the error messages, add the #include and if necessary also add a new directory in the C++ Compiler options.

Keep these “extras” together and above the body of the sketch with an appropriate comment line if you intend to share the code (or just want to be neat, keep sane…).

As an alternative to adding prototypes manually, it is possible to compile and upload in the Arduino IDE and then to grab the C++ code that the IDE creates during its compile process. To find where this is, go to File|Preferences and set the Arduino IDE to “Show verbose output during: [x] compilation”. This will cause the temporary directory containing the C++, all compiled intermediates and the “.hex” file used by the uploader to be revealed. The .cpp should be the same as the sketch but with a few extra lines near the top of the listing. Replace the template sketch.cpp with this.

main.cpp

This is really just a combination of two of Elco Jacobs’ files with a few edits. Since things are a little different for Uno and Leonardo, the main.cpp file differs between the two versions. Remember that the end point is a separate template for each board so two versions are created rather than having to comment out or uncomment code blocks according to the board in use.

NB: You may have to uncomment or add one or mode .cpp or .h files from the Arduino core libraries. See the "//Unused source files" but also be aware there may be some not listed in that section.

main.cpp for Uno
1
2
3
4
5
6
7
8
9
10
11
12
13
14
15
16
17
18
19
20
21
22
23
24
25
26
27
28
29
30
31
32
33
34
35
36
37
38
39
40
41
42
43
44
45
46
47
48
49
50
51
52
53
54
55
#define ARDUINO_MAIN
 
// Disable some warnings for the Arduino files
#pragma GCC diagnostic push
#pragma GCC diagnostic ignored "-Wsign-compare"
#pragma GCC diagnostic ignored "-Wattributes"
#pragma GCC diagnostic ignored "-Wunused-variable"
#pragma GCC diagnostic ignored "-Wuninitialized"
 
#include <Arduino.h>
extern "C"{
	#include <pins_arduino.h>
}
 
/*
* Libraries
*/
// Standard Arduino source files for serial:
#include <HardwareSerial.cpp>
 
// Other source files, depends on your program which you need
#include <Print.cpp>
#include <New.cpp>
#include <wiring.c>
#include <wiring_digital.c>
#include <wiring_analog.c> //analog read/write functions
#include <WString.cpp>
#include <WMath.cpp>
#include <Stream.cpp>
 
// Unused source files:
//#include <WInterrupts.c>
//#include <wiring_pulse.c>
//#include <wiring_shift.c>
//#include <IPAddress.cpp>
//#include <Tone.cpp>
 
// Restore original warnings configuration
#pragma GCC diagnostic pop
 
/*
* Main code called on reset; the sketch harness
*/
int main(void)
{
	init();
 
	setup();
 
	for (;;) {
		loop();
		if (serialEventRun) serialEventRun();
	}
	return 0;
}


main.cpp for Leonardo
1
2
3
4
5
6
7
8
9
10
11
12
13
14
15
16
17
18
19
20
21
22
23
24
25
26
27
28
29
30
31
32
33
34
35
36
37
38
39
40
41
42
43
44
45
46
47
48
49
50
51
52
53
54
55
56
57
58
59
60
61
62
63
#define ARDUINO_MAIN
 
// Disable some warnings for the Arduino files
#pragma GCC diagnostic push
#pragma GCC diagnostic ignored "-Wsign-compare"
#pragma GCC diagnostic ignored "-Wattributes"
#pragma GCC diagnostic ignored "-Wunused-variable"
#pragma GCC diagnostic ignored "-Wuninitialized"
 
#include <Arduino.h>
extern "C"{
	#include <pins_arduino.h>
}
 
/*
* Libraries
*/
// Arduino Leonardo source files for serial:
#define USB_VID 0x2341
#define USB_PID 0x8036
#include <CDC.cpp>
#include <USBCore.cpp>
#include <HID.cpp>
 
// Other source files, depends on your program which you need
#include <Print.cpp>
#include <New.cpp>
#include <wiring.c>
#include <wiring_digital.c>
#include <wiring_analog.c> //analog read/write functions
#include <WString.cpp>
#include <WMath.cpp>
#include <Stream.cpp>
 
// Unused source files:
//#include <WInterrupts.c>
//#include <wiring_pulse.c>
//#include <wiring_shift.c>
//#include <IPAddress.cpp>
//#include <Tone.cpp>
 
// Restore original warnings configuration
#pragma GCC diagnostic pop
 
/*
* Main harness for sketch.
*/
int main(void)
{
	init();
 
	#if defined(USBCON)
	USBDevice.attach();
	#endif
 
	setup();
 
	for (;;) {
		loop();
		if (serialEventRun) serialEventRun();
	}
	return 0;
}


 Try it!

Given the above, it should be possible to cut and paste the “blink” sketch into sketch.cpp and compile using F7 or the Build menu.

2 – uploading

Uploading can be a bit of a pig. The smooth way the Arduino IDE works is, for me, its main redeeming feature. There are several options and I began by using the rather nice MegunoLink tool (which may be downloaded for free and a donation made). MegunoLink allows you to locate the .hex file that is created after compilation and to upload it with ease. It uses avrdude behind the scenes, just as the Arduino IDE does. MegunoLink also includes a rather nice plotting feature, where you can send formatted data over Serial and plot it in real time. Nice! The MegunoLink site also gives an alternative recipe for using AtmelStudio alongside MegunoLink.

For better integration of avrdude with Atmel Studio, you have to do a bit of fiddling. A lot more fiddling was required to get a usable approach for the Leonardo. The end point is upload over the normal USB connection by the click of a mouse or keyboard shortcut inside Atmel Studio.

Setting up for Uno

Tools > External Tools…

Add a new tool, give it a title like “Uno Serial Upload” and set it up something like this (you may need to change the file paths to match where you installed the Arduino IDE to and you may need to change “COM3”):

  • Command = C:\Program Files\Arduino\hardware\tools\avr\bin\avrdude.exe
  • Arguments = -C"C:\Program Files\Arduino\hardware\tools\avr\etc\avrdude.conf" -patmega328p -carduino -P\\.\COM3 -b115200 -Uflash:w:"$(ProjectDir)Debug\$(ItemFileName).hex":i
  • I also checked the “Use Output window” option, which causes the avrdude messages to appear where compiler messages usually do.

A new external tool should be accessible from the Tools menu on saving this data. In use it is essential to first select (click on) the project in the Project Explorer window. This is so that the $(ItemFilenName) is correct. If you have sketch.cpp selected then Atmel Studio tries to invoke avrdude to upload sketch.hex, which does not exist.

Setting up for Leonardo

It would have been nice if the same recipe as for the Uno could be followed, with a simple change to the -p and -c flags in the arguments list. Sadly, the Leonardo needs to be given a kick before it is ready to receive avrdude. This is pretty ugly design IMO. The “kick” is given by making a connection at 1200 Baud, waiting a while for the Leonardo to run its bootloader and get ready and only then trying to use avrdude. The COM port usually changes after the kick and changes back when avrdude finishes. Usually! Yes, “usually”: sometimes I found it didn’t change back after running avrdude if there was an error condition. You can watch this happening in the Device Manager or upload a sketch in the Arduino IDE with verbose output enabled (go to Preferences to enable verbose output) to see the alternative COM port.

The easiest option was to adapt Elco Jacobs’ Python code, which is what the following code shows. Alternatively, you could just follow Elco’s approach but NB that I had problems due to space characters in the path to my Arduino IDE directory (i.e. “Program Files”).

Serial Uploader.py
1
2
3
4
5
6
7
8
9
10
11
12
13
14
15
16
17
18
19
20
21
22
23
24
25
26
27
28
29
30
31
32
33
34
35
36
37
38
39
40
41
42
43
44
45
46
47
48
49
50
51
52
53
54
55
56
57
58
59
60
61
62
63
64
65
import sys
import subprocess as sub
from time import sleep
 
# command line arguments are:
# first is the arduino IDE installation dir
# second is the arduino board type
# third is the .hex file
# fourth is the upload port
# fifth *** only used if Leonardo; omit otherwise *** serial port used to put leonardo into bootloader mode 
 
arduinoPath = sys.argv[1]
boardType = sys.argv[2]
hexFile = sys.argv[3]
port2 = sys.argv[4]
 
if(boardType == 'leonardo'):
   import serial
   port = sys.argv[len(sys.argv)-1]
 
avrconf = arduinoPath + '/hardware/tools/avr/etc/avrdude.conf'
avrdude = arduinoPath + '/hardware/tools/avr/bin/avrdude'
avrsize = arduinoPath + '/hardware/tools/avr/bin/avr-size'
 
boardsFile = open(arduinoPath + '/hardware/arduino/boards.txt',
   'rb').readlines()
 
boardSettings = {}
 
for line in boardsFile:
    if(line.startswith(boardType)):
          # strip board name, period and \n
        setting = line.replace(boardType + '.', '', 1).strip()
        [key, sign, val] = setting.rpartition('=')
        boardSettings[key] = val
 
    # check program size against maximum size
p = sub.Popen([avrsize,hexFile], stdout=sub.PIPE, stderr=sub.PIPE)#, shell=True)
output, errors = p.communicate()
if errors != "":
    print 'avr-size error: ' + errors + '\n'
    exit
 
    print ('Progam size: ' + output.split()[7] +
    ' bytes out of max ' + boardSettings['upload.maximum_size'] + '\n')
 
programCommand = [avrdude,
  	'-C'+avrconf,
   	'-F' ,
   	'-p'+boardSettings['build.mcu'] ,
   	'-c'+ boardSettings['upload.protocol'] ,
   	'-b' + boardSettings['upload.speed'] ,
   	'-P'+port2,
   	'-Uflash:w:'+hexFile+':i']
 
    # open and close serial port at 1200 baud. This resets the Arduino Leonardo
if(boardType == 'leonardo'):
    ser = serial.Serial(port, 1200)
    ser.close()
    sleep(4)  # give the bootloader time to start up
 
p = sub.Popen(programCommand, stdout=sub.PIPE, stderr=sub.PIPE)#, shell=True)
output, errors = p.communicate()
# avrdude only uses stderr, append it
print errors

The idea is to call this bit of python code as an External Tool, similar to the way avrdude was called in the Uno example. You will need to install Python and pySerial. You may also need to change the PATH to include the directory into which Python was installed. I put the “Serial Uploader.py” in the Atmel Studio solutions directory.

This time set up the external tool like this:

  • Command = python.exe
  • Arguments = “C:\Documents and Settings\Adam\My Documents\Atmel Studio\Serial Uploader.py” “C:\Program Files\Arduino” leonardo “$(ProjectDir)Debug\$(ItemFileName).hex” COM6 COM7
  • I also checked the “Use Output window” option, which causes the avrdude or python messages to appear where compiler messages usually do.

The final argument, “COM7” in my case, is the one the Leonardo is attached to when you plug it in. i.e. the COM port you would use in the Arduino IDE. “COM6” is the one that is switched to after the “kick”. You will find that there is quite a lot of delay when using this script – see the sleep(4) command – so do not panic if nothing appears to happen at first.

Obviously, the same python code could also have been used for the Uno case but having already got that one working, I left it alone.

Configuring toolbar and keyboard shortcuts

I don’t like stumbling through menus. Use Tools > Customise then select the Commands tab and follow your nose to add a toolbar button or keyboard shortcut for the “External Tool x”.


3 – a nice-to-have… creating project templates

Atmel Studio allows you to create template projects, which you can select when creating a new project. The template includes all of the compiler options, the processor type and the C++ files. I created a template for each of Uno and Leonardo. And if you just want to grab the templates (bearing in mind they contain the paths to my Arduino installation): Arduino Uno Arduino Leonardo (copy these into Atmel Studio\Templates\ProjectTemplates or use File|Import menu). I’ve also done a similar job for a library template but with some Visual Studio placeholders (Atmel Studio is basically Microsoft Visual Studio under a bit of customisation), but only for Uno: Uno Library Template. The library does not, of course, use the main/sketch convention. Note that, for a reason I cannot fathom, the compiler optimisation setting (-Os) is not correct when a template is used. It looks OK in the template project file but something goes wrong when creating a project from the template.

Once you have parts 1 and 2 completed and working (e.g. using the “blink” example), all you have to do to create a template is File > Export Template and follow your nose…

My templates have no libraries to keep things minimal by default .  Hence, when I create a project using a template, any libraries will need entries in “Directories” as in step 1a {edit: it might have been better to include them all and to delete lines when not needed}.

4 – a recommended Atmel Studio Extension

There is an extension for Atmel Studio that essentially does the same as the Arduino IDE Serial Monitor. It is called “Terminal Window” and it can be installed using Tools > Extension Manager. This is not a “command window”, in spite of what the icon appears to show. Once installed, the terminal window can be started from the View menu. I chose to dock mine to the bottom of the Atmel Studio window, which causes it to become a tab alongside the compiler output and errors/warnings tabs.

Licence etc

Elco made his code available under GPL v3 and you should consider the source code given above to be distrubuted under the same terms since it is a derivative of his work.

* Copyright 2012 Adam Cooper, based heavily on the work of Elco Jacobs.
* See http://www.elcojacobs.com/easy-to-use-atmel-studio-project-for-arduino-and-programming-the-arduino-from-python/
*
* This is free software: you can redistribute it and/or modify
* it under the terms of the GNU General Public License as published by
* the Free Software Foundation, either version 3 of the License, or
* (at your option) any later version.
*
* This software is distributed in the hope that it will be useful,
* but WITHOUT ANY WARRANTY; without even the implied warranty of
* MERCHANTABILITY or FITNESS FOR A PARTICULAR PURPOSE. See the
* GNU General Public License for more details.
*
* See: GNU General Public License
Bulk Upload of Historical Weather Data to Wundergound

A few months ago I bought a weather station but only lately registered with Wunderground and was slightly dismayed that the software I use (Cumulus, which is heaps better than what the station supplier included) does not post historical data; it only uploads to Wunderground what it downloads from the station when Cumulus starts up.

It seems there is no “off the shelf” way of doing this so here is a how-to-do it. The steps should be applicable to any weather station software that stores the data as a “CSV” or formatted text file, with a little bit of fiddling. I guess a similar process works for weather upload sites other than Wunderground too. The steps are:

  • get the stored data into a spreadsheet. This is easy for Cumulus since the data is stored in a text file with commas separating the values and the Cumulus help file tells you what each column is.
  • convert the units. I prefer SI units but Wunderground uses American conventions.
  • create a URL (web address), one for each data record to be uploaded. The structure for these is documented on the wunderground wiki. You can simply copy these into a web browser (Firefox, Internet Explorer etc) one by one but once you’ve had the satisfaction of seeing it work, the remaining thousands of records need a better method.
  • use wget to process a batch of URLs. Wget is free open source software. Windows users can find in installer here.

I’ve uploaded an example spreadsheet that does the conversion and creates the URLs. Notice it has three sheets and that the “Conversion Factors” also contains the base of the URL. This must be edited to have your station name and password. NB there is also a Celcius-Farenheit conversion and the peculiar column L on the “Converted” sheet is needed to get a correctly formatted URL from the date-time combination.

To use wget I copied the URLs into a “.txt” file, one URL per line (just drag down the entries in the column of the spreadsheet and copy/paste into an empty text file) and created a small “.bat” file containing:

PATH “C:\Program Files\GnuWin32\bin”
wget -v -o log.txt -O responses.txt -i “urls Apr12.txt”

You may need to alter the first line depending on where you installed wget. The second line assumes the list of URLs was saved to “urls Apr12.txt”. The “log.txt” file contains verbose logging of each “wget” and the “responses.txt” file should just contain a long string composed of one “sucess” for each sucessful posting of data. If it doesn’t, something went wrong…

ScratchBoard Emulator using Arduino Uno

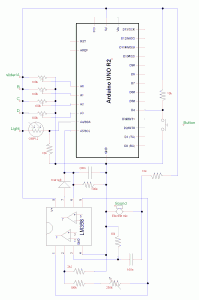
Here is a circuit and arduino code to approximately emulate a ScratchBoard; there is sound, light, a button and four sliders but it isn’t a drop-in replacement.

Zip file download (55kB) contains a schematic (as a PNG graphic and as a TinyCAD file) and an Arduino sketch.

ScratchBoard Emulator Schematic (click image for full-size)

Various notes:

  • The electret mic used was an off-the-shelf component from Maplin Electronics.
  • the sound circuit is essentially “pinched” from the ScratchBoard (NB the circuit is intended to capture amplitude and not the actual audio waveform)
  • the 250k variable resistor provides some gain (amplification) control
  • there are some configurable parameters for the sound sensor in the sketch
  • remember to change the COM ports in the Arduino IDE and in Scratch so that they are not competing (if the Arduino is on COM3 then only one of the IDE or Scratch can use COM3 at a given time)
  • the arduino pin  numbers in the schematic and in the sketch are matched so it should “just work” (build circuit, upload sketch, run Scratch)
  • configuring things in Scratch is a bit cryptic: you need to right-click on the “sensor value” block to show the “watcher” then right-click on that to set the COM port.
  • feel free to adapt and share… all is under open licence.